A simple Form Builder using jQueryUI - Part 1
In this post, we will see how to implement jQuery and jQueryUI to create the first part of form builder. In this part, the form builder will be used to place fields in a column layout – specifically a two column layout.
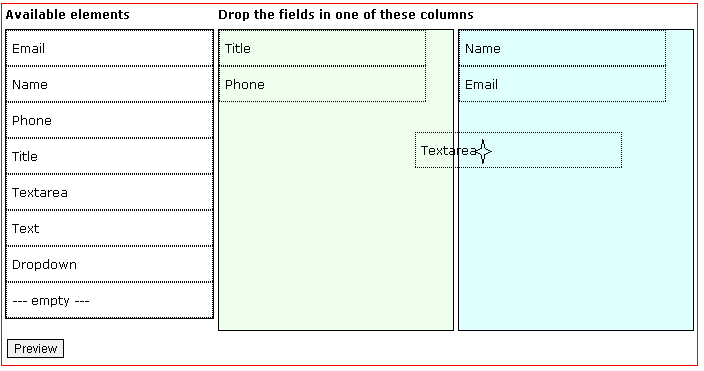
Here we define a table with 3 columns. The first column contains the list of available elements. The other two columns are empty and act as a customizable two column layout.
<table class="containerTable" id="containerTable">
    <thead>
        <tr align="left">
            <th>
                Available elements
            </th>
            <th colspan="2">
                Drop the fields in one of these columns
            </th>
        <tr>
    </thead>
    <tr>
        <td>
            <!-- List of fields to be populated here -->
            <div id="listOfFields"></div>
        </td>

        <!-- droppable columns defined below-->
        <td class="droppedFieldsColumn">
            <div id="selected-column-1" class="droppedFields"></div>
        </td>
        <td class="droppedFieldsColumn" >
            <div id="selected-column-2" class="droppedFields"></div>
        </td>
    </tr>
    <tfoot>
        <tr align="left">
            <td colspan="3">
                <input type="button" value="Preview" onclick="preview();"></input>
            </td>
        <tr>
    </tfoot>
</table>
In the first column we define a DIV with draggable elements. The list of elements is generated by a method getFields(..). These values may be coming from a database or from a selected list of implemented elements.
For now we use this simple method that returns list of fields that contain the name, label and type of the field.
/* populate the list of fields into the div */
var fields = getFields();
$(fields).each(function(index,value) {
    $("#listOfFields").append("<div class='fld'
         fieldtype='"+value.type+"'>"+value.label+"</div>");
});

$(".fld").draggable({ helper: "clone",
      stack: "#containerTable div",cursor: "move"  });
As shown above, we first create the list of fields with a class fld. After creating the list, we simply mark that class as draggable. In the draggable options, we mention helper - clone to avoid moving the original object. The cursor is set to Move and the stack is set so as to show the fields being dragged above the other elements.
Now that we have made these elements draggable, let’s define a drop target for these. This is simply done by the below:
$( ".droppedFields" ).droppable({
      activeClass: "activeDroppable",
      hoverClass: "hoverDroppable",
      accept: ":not(.ui-sortable-helper)",
    drop: function( event, ui ) {
        var fieldtype = $(ui.draggable).attr("fieldtype");
        $( "<div  class='fld' fieldtype='"+fieldtype+"'></div>")
           .html( ui.draggable.html()).appendTo( this );
    }
});
We have created two table column DIVs with class droppedFields. We the above line we mark those as dropppable. In the drop function we create a new DIV element and append it to the column-DIVs.
The acceptoption defines what draggable elements are allowed to be dropped in the column-DIVs.
Applying :not(.ui-sortable-helper) prevents the drop when sorting the elements within the column-DIV.
The elements are made sortable with the following lines:
$( ".droppedFields" ).sortable();
$( ".droppedFields" ).disableSelection();
User can now drag and drop the elements from the list of available elements and place those into one of the two containers.
In this demo, when you click preview, we collect the list of elements in each column and create an array of objects defining the columns. This array is currently used to show the list of columns in the preview - but this can be processed further to render HTML elements. This array can also be serialized and stored into a database to preserve the customization. Keep looking for further enhancements in other parts of this series and happy coding!